|
Ten Basic Tips for Better Pictures |
| |
|
"The difference between
a nice picture and a really fine one is often a matter of inches--of bending
your knees a bit or shifting to the right or left." --William Albert Allard,
from National Geographic
Photography Field Guide |
| |
|
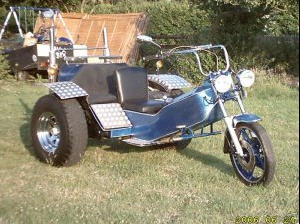
Everybody experiences
it. You shoot some photos with your camera of your trike and when you look
at them later the results are about as exciting as 7-Eleven video
surveillance footage. Looking for a scapegoat, you may mutter something
like, "This camera is a hunk of junk!" However, I've personally found that
it is more often my mistakes that make for less-than-stellar pictures, not
something wrong with the camera. But the good news is that it's relatively
easy to improve your photos--no matter whether you shoot with a $20
point-and-shoot, a fancy SLR, or a whiz-bang digital camera. Here are 10
tips on how to improve your photos, impress everybody, and let your camera
off the hook. |
| |
|
1. Shoot More Pictures
All professional photographers know that the only way to come up with truly
great shots is to take lots of pictures. Let go of the inner critic who
wants to tell you that you're being wasteful. First of all, the practice
will help you get better. More importantly, if you explore your subject a
little longer than usual, you are likely to either get lucky, which
photographers call serendipity, or you might discover a new angle or pose
that really works. Years later, which will you treasure more--the few cents
saved on not taking an extra shot, or a great snapshot of a favorite memory?
|
| |
|
2. Hold Still
Shooting photos is a lot like target practice. In order to hit the
bull's-eye and capture a perfectly sharp image, it is important to hold the
camera steady and not rush the shot. As most pros know, the best way to
ensure precise, sharp shots is to use a tripod. Using a tripod is usually
impractical for most snapshooters, however. Instead, try leaning against a
nearby tree or wall for extra stability, especially if you are shooting with
a long lens or full zoom. Keep both arms close to your chest, and try using
your thumb to press the shutter button on vertical shots so your arm isn't
extended way out over your head. Remember, if you move the camera when
taking the shot, it will show up as blur in your resulting image.
|
| |
|
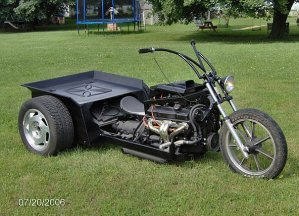
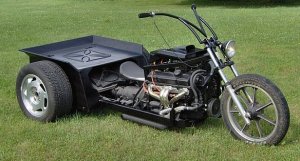
3. Don't Stand Too Far
Away
One of the most common mistakes people make when taking pictures is standing
too far away from their desired subject. Your brain focuses on your subject,
but your camera doesn't know what is subject and what is background--and if
you're too far away, the background will overwhelm your real subject. Step
in closer for a more intimate and dynamic picture with greater detail of
what really counts, or zoom in so your subject fills the frame.
|
| |
|
 |
 |
|
Example 1 |
Example 2 |
|
| |
|
4. Avoid Shooting into
the Sun
Another mistake many people make is to shoot with their subjects in front of
the sun or other bright lights (often called "backlighting"). This creates a
silhouette and tons of contrast in the picture. Make sure you move your
subjects around so the light is either directly on them (and behind the
photographer) or at least to the side. (Of course, if you want to make a
silhouette, then by all means shoot with your subject backlit.)
|
| |
|
 |
| |
|
55. Go Out at Dusk and
Dawn
Often the best time to take pictures is in the early hours of the morning
just after dawn, and in the late hours of the afternoon just before
sunset--at this time, sunlight becomes warm and rich, and shadows lengthen,
lending additional detail to subjects. The light can also be quite
spectacular right after the sun sets when the sky lights up like a stage
backdrop. Sunlight during the middle of the day can often look flat and
harsh in pictures, so if you can, try heading out for photos during the
"magic hours" of sunrise and sunset. |
| |
|
|
| If you are looking for
great skies in your photos, try shooting photos on days when there are some
clouds. A little weather can make your pictures more interesting. One other
tip I once heard from a National Geographic photographer is to turn
around during a sunset and look to see what this special light is hitting.
Too often, he explained, we try to photograph the obvious--the sunset--while
right behind us beautiful things might be transpiring. This is some of the
best advice I've heard, and I always remember it when I'm out with my camera
around sunset.
6. Use the Rule of Thirds
The "Rule of Thirds" is a composition trick dating back to Renaissance
painting (and probably beyond) that reminds us not to center everything we
photograph. While our natural instinct is to place our subject squarely in
the center to draw attention to it, placing it off-center can add an extra
element of interest to the photo. Basically, in your mind try to imagine a
tic-tac-toe grid placed over every scene while you are composing your
picture. Position the key elements in the scene at the points where the
lines of the grid intersect. This gives you much more interesting and
dynamic results than you get when you simply put the subject in the middle.
The main problem with this approach is that most automatic cameras require
you to place your subject in the middle to focus; however, most cameras
allow you to aim with your intended subject in the middle, depress the
shutter button halfway to lock in the focus, and then move the camera to
reposition your subject elsewhere in the frame. |
|
7. Try Fill-in Flash
Ever try using your flash in the daytime? One of the best ways to improve
portraits is to use a combination of available light and flash (usually
called "fill-in flash" when used in this manner). This way, the natural
light of the scene is not completely disrupted, but the flash softens harsh
shadows, especially on the face, and highlights the eyes. To use your flash
for fill-in, simply set your camera to the "flash-on" (as opposed to auto
flash or flash-off) modes. If you can set the flash on your camera at about
half power (some automatic cameras have this mode as well), that's even
better. |
|
8. Watch Your Foreground
and Background
Many fine photos are ruined by distracting elements in the foreground or
background. Take the time to compose your shot carefully enough so that you
don't include a telephone pole sticking out of Uncle Harry's head or a tree
branch jutting into the bottom of the picture. Also, keep a lookout for
distracting reflections that can show up if you are trying to photograph a
scene with windows in the background or other reflective surfaces like
metal. Try to compose your photos with a clean background whenever
possible--your goal should be simplicity. Look for patterns in both the
background and foreground that might add an interesting element to the
picture. You can increase dramatic effect by shortening or lengthening the
foreground. Include people in the foreground of your landscape shots to
create a sense of scale and perspective. |
| |
|
 |
| |
|
9. Use a Tripod
Don't hesitate to use a tripod, especially for night shots where a long
exposure is unavoidable, or indoor scenes such as in large buildings. Some
of my best images have resulted when I've taken the time to set up my tripod
and bracket my shots. Find a tripod that isn't too bulky so you won't get in
the habit of leaving it at home--you can buy a lightweight, inexpensive
tripod for $20 to $40. Experiment with scenes that offer fixed elements and
moving elements, like Grand Central Station in New York. I've got some great
shots from inside the main terminal at Grand Central. They show blurred
people in motion hurrying to and from the trains, along with people standing
still in line waiting to buy a ticket or ask for information. I also like to
photograph neon signs at night, and using a tripod allows me to avoid camera
shake and saturate the colors. |
| |
10. Fill
the Frame
One of the great photographic masters, Ralph Gibson, once said, "I am not
interested in anything except filling the surface of my print with the high
tension of a snare drum." To translate, exciting photographs fill the entire
frame with their subject. Think of the whole rectangle of each photograph as
your canvas. Also, experiment with cropping in on your subject, sometimes
cutting out legs, the top of somebody's head, anything to create a more
surprising composition. Push the envelope and you may really be amazed at
some of the results.
One last word--these are tips, not
rules. Be aware of them, but also feel free to go against them if you feel
it might work. Perhaps the best advice I have ever received was from one of
my photography instructors, Larry Sultan, who said, "If you feel the urge to
take a picture, don't hesitate." |
| |
| |
|
 |
| |