|
|
|
WIRING YOUR TRIKE |
|
Wiring your trike isn't as hard as you may think! |
|
|
|
First thing you need to do is check with your local vehicle laws. Here in Washington State we have RCW codes concerning motorcycles and lighting requirements which we have to follow. I recommend that you follow your codes also and you can go down to the local vehicle inspection station to make sure that you comply with all of their requirements. |
|
You then need to install all your lighting, headlight/s, taillights, brake lights, turn signals, etc. Install your gauge and switch panel, gauges and switches, horn, and other electrics that are found on your engine i.e. starter, alt or generator, coil, ignition switch, etc. Install your fuse panel used to connect the individual wires to the fused circuits. You can make your own fuse panel or purchase one from your local auto parts store. I used one that I purchased from a marine parts store. |
|
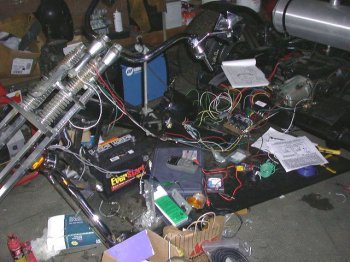
Now with the gauges, lights and other electrical equipment installed you are ready to wire it up. First you need individual rolls of colored wire. Actual lengths of wire needed will vary for a number of reasons, trike length, location of the fuse panel, direction of the wiring, etc. If you don't have enough different colored wire for each circuit you can use number sets or colored tapes so you will know what is what and where it goes. |
|
In a car, stranded wire should be used exclusively. Stranded wire is made of many strands of fine wire that can be repeatedly moved without breaking from the vibration and flexing from driving. Solid core wire will break from vibration and movement. Solid core wire is typically used in your house wiring where the wires are stapled to the beams to prevent movement. |
|
The gauges or sizes of the wiring are: |
|
16 gauge - horn, lights, electric instruments, etc. |
|
12 gauge - ignition switch, battery, generator, regulator and alternator |
|
4 gauge - battery cable, both positive and negative |
|
About Ground Wires |
|
If the circuit you're wiring requires that you run a separate ground wire (that is, if the components aren't self grounding), make sure that you use the same size or larger wire for the ground as you did for the feed wire. Some people forget that the ground wire has to carry the same current as the rest of the circuit and will just use a small ground wire. Not good enough! Watch out for discount store components, too, they sometimes have undersize wires. |
|
Connectors and Terminals |
|
Even this can seem complicated. Do I use crimp-on or soldered terminals? What size is right? How do I crimp? With what tool? |
|
Crimp vs. Solder |
|
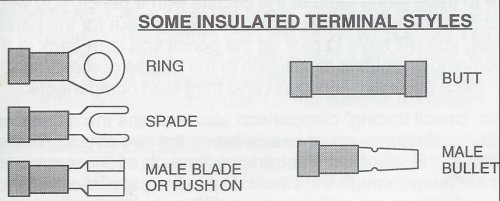
Some people say the only way to make good connections is to solder them. But, soldering makes the connection and adjacent wire more brittle. In vehicles, including trikes, vibration is a factor, and brittleness isn't good. So most vehicle connections are made by cold crimping. A properly cold crimped terminal is as good as a soldered joint with less chance of breaking. If you do solder some connections, be sure to use rosin core flux, not acid core flux. Flux helps to "wet" the copper wires and float off oxides so that the solder will stick better. Rosin is the correct flux for electrical work. Acid flux will corrode the wire and attack insulation. Be sure to wipe off excess flux that is let after making the solder joint. If you haven't done much soldering I recommend you look it up on Google and review how to solder.... Crimp terminals come in different colors like red, blue, and yellow. This coding tells you what size of wire the terminal is intended for. Red terminals fit 18 to 20 gauge wire, blue fits 14 to 16 gauge wire and yellow is for 10 to 12 gauge. If you are joining two wires in the same terminal you may have to go up one size of terminal to get the wires to fit easily. There are more styles of terminals than we can cove here. Butt and bullet connectors, spade, ring, and blade terminals are just a few. But for the most part, the style that you need will be pretty obvious. Just make sure it's the right size. Try to purchase quality marine grade terminals not the cheap ones sold in sets at some stores.
|
|
|
|
Crimping Tools |
|
|
|
TYPES OF WIRE CRIMPERS (The vice grips on the left is not a wire crimper) I have seen people use these to crimp wires, don't do it!!!! The next one, with the yellow handles, is a cheap hardware quality crimper and should only be used in emergencies. The middle one is a decent quality Klein crimper (not really suited for much more than non-insulated terminals. The next one is a good quality crimper made by Anchor products and designed specifically for crimping marine or aviation grade heat shrink terminations. The jaws of this crimper are precision machined, and wide enough in cross section, to produce an excellent crimp. This crimper is also of the ratcheting type and will not release until a proper crimp has been made. The final crimper shown is another ratcheting type crimper but this one, set up with the jaws shown, is designed for insulated terminals. |
|
Crimping tools vary in style and price. It is recommended that you use a tool that is physically larger than the cheapest units. It will be made of thicker material and will have longer handles to give more leverage. Also, the crimping area will be toward the nose of the unit, not between the pivot and the handles, if you are doing a bunch of terminals, it is easier to get the tool "around" the terminal in preparation for crimping if its done at the nose end. The crimping jaws should flatten the terminal not pierce it. Again size the crimp jaw to the terminal size. A test of your crimp joint is to give it a good pull - you'll know if it's on tight. If you're using insulated terminals, your done. If not, add some electrical tape for protection. Or better yet, put some shrink tubing over the connection for protection and looks. You can even get it in colors to match the wire or to designate a particular circuit or hot wires vs. switched wires, etc. |
|
|