|
|
|
We must protect individual electrical circuits from overloads. This is usually accomplished using a fuse. Fuses are not intended to protect the equipment, rather, they are installed to protect the cable (electrical wire) attaching the power source and the equipment. Of course, in protecting the cable the equipment is also protected. If you closely analyze most electrical faults they are produced by failure of an electrical device that in turn causes it to draw an extremely high amount of current. In reality, how often will you be able to solve the problem by replacing a fuse? Probably not very often. A short in a wire will also cause an electrical fault. The bottom line is that you must select the right size fuse for the size wire you are running to the component part. The circuit protection should open before the wire gets hot enough to begin smoking. Another point worth mentioning is that if the circuit protection is too small for the wire size you will get a nuisance protection requiring you to reset the circuit breaker or replace the fuse even though a major problem may not exist. shows the comparison between wire size and circuit protection.
|
|
Wire
AN |
Circuit
Breaker |
Fuse |
| 22 | 5 | 5 |
| 20 | 7.5 | 5 |
| 18 | 10 | 10 |
| 16 | 15 | 10 |
| 14 | 20 | 15 |
| 12 | 25/30 | 20 |
| 10 | 35/40 | 30 |
| 8 | 50 | 50 |
|
What would happen if we did not comply with these guidelines? Let's assume we install a 10-amp circuit breaker in a circuit connected by a 22 gauge wire. As long as everything is normal you will probably not know the difference. However, should an electrical fault occur in this circuit, the breaker may not trip until the wire gets so hot that it causes an electrical fire. |
|
|
ELECTRICAL WIRING AND CONNECTORS |
|
|
As mentioned under circuit protection, the
size of the wire is of utmost importance. The wire size will be selected
based upon the amount of current the wire will carry and the required length
of the wire. The voltage drop resulting from a long length of wire can be
significant.
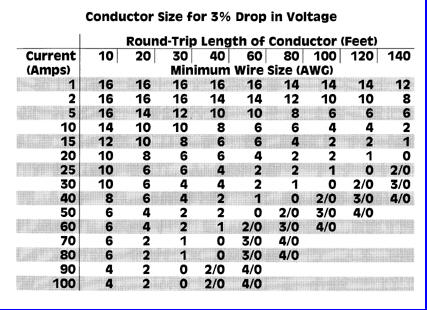
Size
To size wiring, you need the wire length from the power source to the appliance(s) and back to the power source. Doubling the straight line distance to the battery or electrical panel is not adequate. You must determine the actual length of the wire by measuring along the path it will follow-up, over, and around. It is not unusual for a wire run to be more than twice the straight-line distance. Some voltage is used up pushing the current through the wire. This loss, called voltage drop, should not exceed 3%. The table shows what size wire is required to deliver adequate voltage to the other end. Use the potential current draw to select the row, the round trip wire length to select the column. The number where these two intersect is the wire size you need. Electrical wire appropriate for marine use will have the gauge designation printed on the insulation. The smaller the gauge number, the larger the wire diameter. Always buy wire at least a foot or two longer than your measurement. You can easily shorten the wire after it is installed, but lengthening it requires a highly undesirable splice. Each wire should be a single continuous run between terminals.
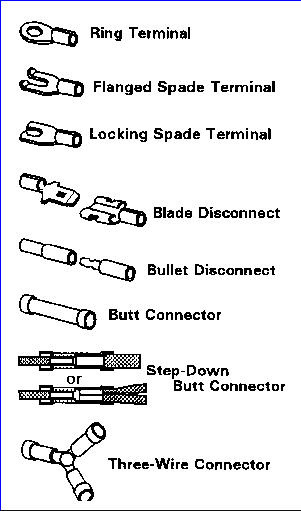
A large number of electrical problems are the result of poor connections between the electrical cables and the various components of the system. Most cables are corrected with "crimp-on" connectors, such as ring-end terminals or butt splices. Often a solder joint will be used to complete the connection. I would recommend the use of "crimp-on" connectors whenever possible. Solder joints are subject to breaking or weakening when subjected to vibration. If you use a solder joint, be sure to support the wire near the joint to prevent flexing.
|
|
 |
|
Color of Connector |
Size of Wire |
|
Red |
18-20-22 gauge |
|
Blue |
14-16 gauge |
|
Yellow |
10-12 gauge |
|
|