|
|
|
|
Wire stripping and installing connectors |
|
|
|
|
|
Crimping
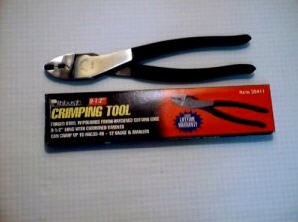
Nine times out of ten, stripping insulation with a pocket knife results in nicked wire, which opens the door to corrosion. And you simply cannot make a dependable crimp connection with a pair of pliers. You should own or purchase a wire stripper and a good-quality crimper. The cost is nominal. Contacts may be readily crimped onto bare wires by a number of tools. The full-cycle ratchet tool produces the best joint, but the cost is prohibitive for most. Other suitable (but not full-cycle ratchet type) tools can produce good joints, given a measure of care. Among these useful tools are those manufactured by Klein, Gardner-Denver and Harbor Freight. After using all of those mentioned, The Harbor Freight 36411 (type in 36411-2VGA) in the "find item number" box) tool is good for it's $6 cost. It also has, in addition to a properly sized anvil/die, a forged round forming section that is ideal for fixing mistakes.
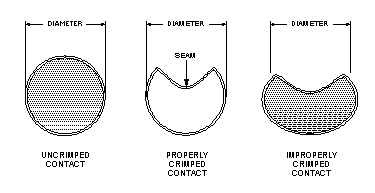
The principal contribution to failure when crimping these contacts is allowing the width of the contact to expand during the process. This results in a contact that cannot be properly inserted into the plastic housing. If the crimping tool die is improperly sized (i.e., too big), the contact diameter will be enlarged as it is crimped or will become "flattened" during the process |
|
|
|
|
|
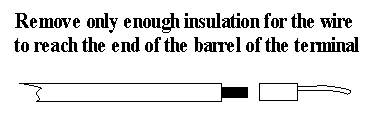
Selecting the proper connector requires that you match it to the wire gauge and to the size of the terminal screw. Ring terminals are your best choice unless the terminal screw is captive. In that case, use flanged spade connectors. Terminals used on a trike must always be copper, never steel or aluminum, and like the wire, they should be tin-plated to resist corrosion. The first step in
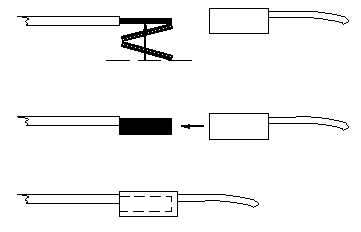
avoiding damage to a contact while crimping is to carefully align the
contact into the tool before inserting the wire. Insert the contact
into the anvil/die such that the seam of the contact barrel is adjacent to
the die. (Explicitly, this means that the contact is placed into the
crimping tool with the seam of the barrel facing the "pointed" side of the
crimper). The seam side will be pressed into the wire as the tool is closed.
This results in the least enlargement of the diameter of the contact as
pressure is applied.
Crimping Better terminals feature a brass sleeve that can be crimped over the insulated wire to add mechanical strength. This type of terminal is usually installed with a double crimp tool. If your crimper doesn't have a double-crimp die, crimp the terminal to the wire first, then reposition the crimper and crimp the sleeve to the insulation. |
|
|
|
|
|
If you need to attach wires smaller than 14 AWG to a 30A contact, you should strip a longer length, fold the bare conductor in a "Z-fold" fashion and insert the multiple folds of the wire into the contact barrel. This will help to prevent flattening of the contact when it is crimped. |
|
|
|
|
|
There is only one accepted field test for a crimp terminal-pull on it. Test every crimp terminal this way. Without using any tool, grip the terminal and the wire and try to separate them. If they come apart, the crimp was bad. |
|
|